Overview
Microsoft Teams is an easy way to pull together a group to share, collaborate and communicate in one central location without the use of phone calls that take time away from our day or emails that can easily get buried. From directly within Teams we can bring everyone together to share information, securely edit files live and at the same time, bring together Microsoft Office 365 apps (OneDrive, OneNote, Planner, Forms, etc) and third-party apps and websites in one place, tag members of the team in conversations or actions and customize the work through adding notes (OneNote and others) and other applications.
Setting options in meetings is an important step to making sure you have the most control over the meeting while it is in progress.
For more information visit: Meeting options in Microsoft Teams - Microsoft Support
About meeting options
Meeting access
|
Meeting option
|
What it does
|
When to use it
|
|
Who can bypass the lobby?
|
Decide who gets into meetings directly and who should wait to be let in by using the lobby.
If you use the lobby, you (and anyone else allowed to admit people) will see a list of people in the lobby. From there you can choose to admit or deny them.
|
Use the lobby to add another layer of security to your meeting.
Easily manage larger meetings by allowing people from trusted organizations and accounts to bypass the lobby.
|
|
People dialing in can bypass the lobby
|
Turn the People dialing in can bypass the lobby toggle on to allow anyone joining your meeting by phone to enter without waiting in the lobby.
Depending on policies set by your IT admin, people dialing in might be placed in the lobby temporarily until someone from your org or a trusted org joins the meeting.
|
Apply this setting in larger meetings to reduce the amount of people waiting and manage the lobby more easily.
|
|
Who can admit from the lobby
|
Choose who can let people into your event from the lobby.
By default, organizers, co-organizers, and presenters can admit people from the lobby.
|
Change this setting to prevent presenters from managing the lobby and increase meeting security.
|
|
Announce when people dialing in join or leave.
|
Turn the Announce when people dialing in join or leave toggle on to receive alerts when people calling in by phone join or leave your meeting. Your admin might have enabled these alerts by default.
|
Use this setting when you want to keep track of who is still in your meeting, and who has already left.
|
|
Require unverified participants to verify their info before joining
|
When you turn on the Require unverified participants to verify their info before joining toggle, unverified participants will receive an email with a one-time passcode they'll need to enter to join the meeting.
|
Use this when you want extra verification for participants attending the meeting. Your admin policy might also affect how people join.
|
Roles
|
Meeting option
|
What it does
|
When to use it
|
|
Choose co-organizers
|
After you invite people to your meeting, add co-organizers to give them most organizer capabilities.
|
Add co-organizers for more help managing the meeting, lobby, and breakout rooms.
|
|
Who can present
|
See Roles in a Teams meeting for details about selecting presenters and changing someone's role before and during a meeting.
Note: Meeting rooms are part of your org, so they'll join meetings the same way any other participant in your org does.
|
Designate presenters before and during your meeting to keep your meeting focused and on-track.
|
|
Enable language interpretation
|
Turn on the Enable language interpretation toggle to add a professional interpreter to your meeting who can instantly translate the speaker’s language into another in real-time.
|
Break down the language barrier in multi-lingual meetings with language interpretation.
|
Production tools
|
Meeting option
|
What it does
|
When to use it
|
|
Manage what attendees see
|
Specify presenters and turn on the Manage what attendees see toggle to show only shared content and people you bring on screen.
This option will limit attendee mic and camera use.
|
Use this setting to keep your meeting on-track, professional, and free of distractions.
|
|
Enable Green room
|
The Green room allows organizers and presenters to join an event while attendees wait in the lobby.
|
Use the Green room to prepare for an event before attendees are present. Test your audio and video, shared content, and more.
|
Participation
|
Meeting option
|
What it does
|
When to use it
|
|
Allow mic for attendees
|
Turn the Allow mic for attendees toggle on or off to change attendee mic permissions.
|
Use this setting to manage attendee discussion during a meeting.
|
|
Allow camera for attendees
|
Turn the Allow camera for attendees toggle on or off to change attendee camera permissions.
|
Turn this setting off to keep focus on shared content and presenters during a meeting and encourage attendee participation.
|
|
Meeting chat
|
Change this setting to let attendees chat anytime, during a meeting only, or not at all.
By default, anyone invited to a meeting can participate in the meeting chat before, during, and after the meeting.
|
Change this setting to limit or open attendee discussion during a meeting or event.
|
|
Q&A
|
Enable Q&A to allow attendees to ask questions, post replies, and post anonymously during a meeting. Q&A can be unmoderated or moderated by meeting co-organizers.
|
Use Q&A to make large events more interactive and engaging for attendees. Receive and respond to people’s questions in real-time.
|
|
Allow reactions
|
By default, attendees can send live reactions during a meeting to express how they feel about what’s being shared.
|
Turn off the Allow reactions toggle in larger meetings to limit distractions or keep the meeting recording free from reaction pop-ups.
|
|
Let people edit their display name
|
Turn on the Let people edit their display name toggle to allow participants to change their display name during a meeting.
Note: For video tiles under 250 x 140 pixels, an attendee's full name will only appear on hover due to size limitations.
|
Enable this setting to give participants more discretion over how they want to be presented in a meeting.
|
|
Hide attendee names
|
Turn on the Hide attendee names toggle to keep attendees anonymous to each other. Only organizers, presenters, and apps will have access to attendee names.
To use this setting, first make people presenters before the meeting. Then, turn on the Hide attendee names toggle before the meeting starts.
|
Use this setting to ensure attendee privacy during a meeting or event.
|
|
Allow attendance report
|
Attendance reports contain meeting attendance details, including how long attendees stayed, and how long your meeting lasted, and more.
Turn on the Allow attendance report toggle to generate, view, and download attendance reports.
|
Use attendance reports to gain more insights about your meeting and participant behaviors.
|
Recording & transcription
|
Meeting option
|
What it does
|
When to use it
|
|
Record and transcribe automatically
|
Turn on the Record and transcribe automatically toggle to record and transcribe your meeting as soon as it starts.
|
Appy this setting to make sure all your meeting is recorded and transcribed from the moment it starts until it ends or you stop recording and transcribing.
|
|
Enable multilingual speech recognition
|
Turn on the Enable multilingual speech recognition toggle to allow everyone to be understood in their spoken languages.
For transcription and caption accuracy, make sure each person sets their correct spoken language.
|
Use this setting during meetings and events where people are speaking multiple languages to ensure everyone understands each other.
|
Copilot and other AI
|
Meeting option
|
What it does
|
When to use it
|
|
Allow Copilot
|
Choose when to allow Copilot during a meeting or event by selecting an option from the Allow Copilot dropdown menu.
If you choose Only during the meeting, Copilot can work without turning on transcription. If you turn on transcription, Copilot can always be used after the meeting.
|
Modify this setting to limit or expand when Copilot is used for a meeting.
|
|
AI-generated notes
|
Turn on the AI-generated notes toggle to automatically generate notes during a meeting.
|
Use this setting to easily return to important meeting highlights, like discussion points, assigned tasks, and more.
|
Accessibility
|
Meeting option
|
What it does
|
When to use it
|
|
Provide CART Captions
|
Turn on the Provide CART Captions toggle to use Communication access real-time translation (CART) captions during a meeting.
CART captions are generated by a trained CART captioner who listens and translates speech into text instantly.
|
Use CART captions to provide accurately translated captions and make your meeting more accessible and inclusive.
|
Default meeting options
Default meeting options are set by your IT admin and may affect meeting security or which features you can use.
Network outages
In case of a Teams network outage, your meeting options might revert back to the defaults set by your IT admin. If this happens, check your meeting options before your meeting starts to make sure they’re set the way you want them.
Your settings will return to normal once the outage is resolved. For more help, contact your IT admin.
Change meeting options
If you organize a meeting, you can access and change its settings depending on the meeting type:
Scheduled meetings
There are several different ways to get to meeting options.
Tip: Meeting options will open in a new window on your default browser. For the best experience, use Edge to open all meeting options.
Lock a meeting
In Teams, meeting organizers can choose to lock their meetings to prevent subsequent join attempts. Anyone attempting to join a locked meeting from any device will be informed that the meeting is locked.
To lock a meeting:
-
Select People  in the meeting controls.
-
In the Participants pane, select More actions  > Lock the meeting
  (or unlock it when locked).

When a meeting is locked, no additional participants will be able to join, but invitees can still access the meeting chat, recording, and other meeting info.
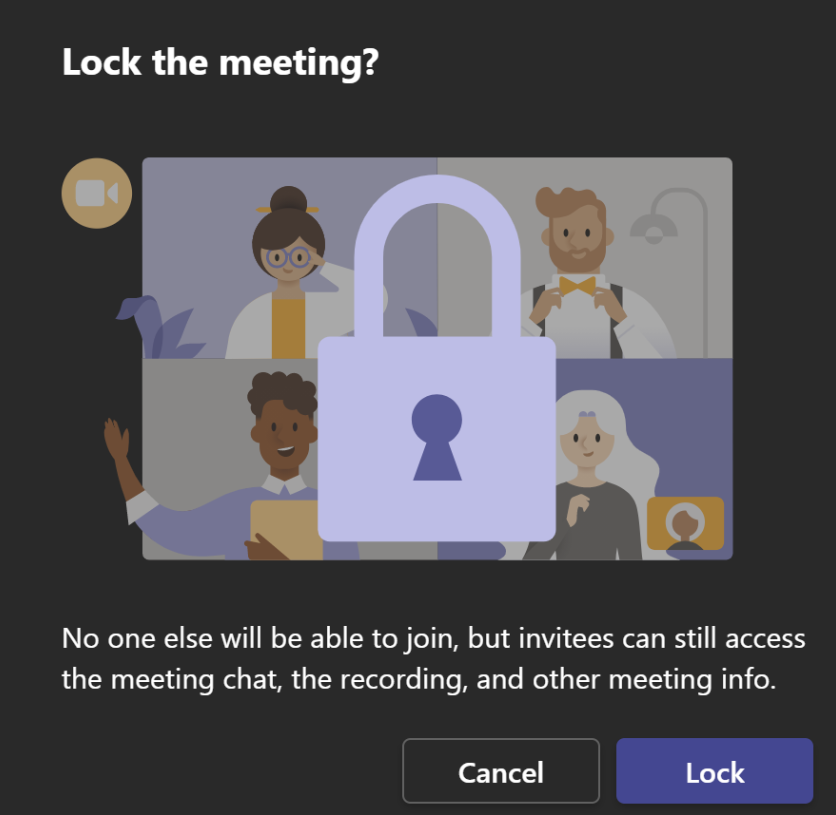
Note: Once participants leave the meeting, they will not be able to join again until the meeting is unlocked.