Using your pen with Microsoft OneNote
The Laptops for Learners program offers each Cedar Crest student their own laptop/tablet device that is supported by the College. One of the features is the ability to ink, write, and draw using the included stylus/pen with multiple applications. Using your included stylus/pen is as easy as inserting the battery (as demonstrated during your live session) and drawing away!
One free application that is included is Microsoft OneNote.
Here are some tips and pointers on using Microsoft OneNote with your included stylus/pen.
Microsoft OneNote and Inking/Pen
-
With OneNote for Windows 10, you can hand write notes and draw or sketch things in your notebook. This works especially well on a device with a touch screen, but you can also draw with a mouse.
The new pen set is customizable and portable. You define the pens, pencils, and highlighters you need, and they are then available in OneNote, Word, Excel, and PowerPoint.
-
Click here to watch a quick video from Microsoft to walk you through how to select different pens in OneNote! Click here.
-
Draw with ink
-
On the Draw menu, click or tap a pen, pencil, or highlighter you want to use.
-
Click the downward-facing arrow that appears next to your selection, and then select your preferred ink color.
Tip: If the color you want isn’t shown in the palette, click More Colors.
-
Click or tap the + symbol as often as you want to increase the pen or highlighter thickness.
-
Click or tap the – symbol as often as you want to decrease the pen or highlighter thickness.
Erase ink strokes
To erase what you've drawn, click or tap Eraser and choose one of the following:
-
Small, Medium or Large Eraser—these let you manually erase portions of your drawing.
-
Stroke Eraser—this removes entire drawing gestures with one tap.
Note: If you remove something you didn't mean to erase, tap Undo  in the upper-left corner of the app or press Ctrl+Z on an external keyboard.
Select multiple ink strokes
To work with several ink strokes as one item, tap Lasso Select and draw around the strokes or drawings you want to group together.
Learn more about selecting ink strokes
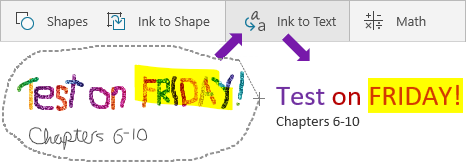
Convert ink to text
OneNote includes a handy conversion tool so you can change handwritten text into typed text. It will even preserve the size and color of your ink, as well as highlights and effects.
-
On the Draw tab, tap Lasso Select.
-
On the page, draw around the handwriting you want to convert.
-
On the Draw tab, tap Ink to Text.
Note: Some results may take up to 24-48 hours to become available, enabling the Ink to Text command.
Insert lines, arrows, shapes, or graphs
-
On the Draw menu, click or tap Shapes.
-
Select a line, arrow, or shape to draw on the page.
-
Once a line, arrow, or shape is one the page, you can select it to move, rotate or resize it.
-
To type again, tap Select Objects or Type Text.
Draw precise shapes
You can draw a shape that OneNote automatically cleans up and converts to a precise shape. For example, if you draw a square, OneNote will convert the square to an actual square with perfect right angles.
-
On the Draw menu, click or tap Select Objects or Type Text, and then click or tap Ink to shape.
-
Draw a shape, such as a circle, triangle, or rectangle.
The hand-drawn shape changes into a shape with straight lines or clean corners.
-
To type again, tap Select Objects or Type Text.
Pan and zoom while drawing
To exit Drawing mode so you can pan and zoom, tap Select Objects or Type Text.
Choose one of the following:
-
To zoom in and out, pinch and stretch the screen with two fingers.
-
To scroll, swipe up and down with one finger.
-
To pan, swipe left and right with one finger.
-
When you're done, click or tap a pen, pencil, or highlighter to draw again.
Use pens in other Office apps
If you're signed into the other Office 365 apps with the same Microsoft Account, your pens "roam" with you, and any custom settings you made to pens in OneNote will show up between the Office 365 applications.
-
In Excel, Word, or PowerPoint, Click or tap the Review tab.
In Visio, click or tap the Draw tab.
-
Click or tap Start Inking.