Overview
Microsoft Teams is an easy way to pull together a group to share, collaborate and communicate in one central location without the use of phone calls that take time away from our day or emails that can easily get buried. From directly within Teams we can bring everyone together to share information, securely edit files live and at the same time, bring together Microsoft Office 365 apps (OneDrive, OneNote, Planner, Forms, etc) and third-party apps and websites in one place, tag members of the team in conversations or actions and customize the work through adding notes (OneNote and others) and other applications.
Within Teams, recording things for your own private use is easy, fast, and a great way to archive videos for your own use. Here are our suggestions on the best way to make recordings, and use them in other places (classes, editing, etc).
Recording
Start recording
In a Teams meeting, one person can record at a time. When you start recording a meeting, everyone will be notified automatically. You can also turn on live transcriptions and view them during the meeting.
To start a meeting recording:
-
Start or join the meeting.
-
In your meeting controls, select More actions  > Record and transcribe
  > Start recording .
Notes: Meeting recordings won't capture:
-
More than four peoples' video streams at once
-
Whiteboards and annotations
-
Shared notes
-
Content shared by apps
-
Videos or animations embedded in PowerPoint Live presentations
Stop recording
-
In the meeting controls, select More actions  > Record and transcribe .
-
Choose one of the following:
Important:
-
After a recording stops, it's processed and saved to Stream. Then, it's ready to play.
-
When a recording is available, the meeting organizer will receive an email. The recording will appear in the meeting chat or channel.
-
If an admin has set a company policy for saving to Stream, accept it before recording.
Find recordings
Recordings are available in different places depending on the type of meeting.
Note: For now, guests and external attendees can view the recording only if it's explicitly shared with them.
Who can start or stop a recording?
Anyone who meets the following criteria can start or stop a recording if the meeting organizer has their cloud recording policy setting turned on:
-
Has one of the following licenses: Office 365 Enterprise E1, E3, E5, F3, A1, A3, A5, M365 Business, Business Premium, or Business Essentials.
-
Has recording enabled by an IT admin.
-
Isn't a guest or from another organization.
The organizer doesn't need to be present.
|
Type of user
|
Can start recording?
|
Can stop recording?
|
|
Meeting organizer
|
Yes
|
Yes
|
|
Person from same org
|
Yes
|
Yes
|
|
Person from another org or company
|
No
|
No
|
|
Guest
|
No
|
No
|
|
Anonymous
|
No
|
No
|
Notes:
-
Recording continues even if the person who started the recording leaves the meeting.
-
The recording stops automatically once everyone leaves the meeting. If someone forgets to leave, the recording stops after four hours.
-
If one of the participants has a policy for compliance recording, the meeting will be recorded according to the policy even if that participant is from another org.
Choose who can record and transcribe
See Roles in a Teams meeting for details about selecting presenters and changing someone's role before and during a meeting.
-
In Teams, go to your Calendar  .
.
-
Select New meeting.
-
Add people to the meeting.
-
In the meeting invitation, select More options.
-
Set meeting participants as presenters and co-organizers, as necessary.
-
Go to Recording & transcript  .
.
-
Next to Who can record and transcribe, select an option from the dropdown menu. This option isn't available if the meeting is set to record automatically.
-
Select Save.
Manage the expiration of a meeting recording
Your admin settings determine a recording's expiration. To change the expiration of a meeting recording:
Important: You must have edit permission for the recording to change the expiration date. Generally speaking, the meeting organizer and co-organizers are automatically granted edit permission.
-
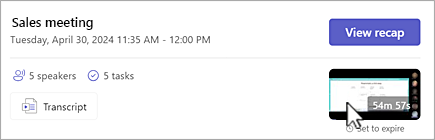
Find the recording in the meeting chat, then open the recording in Stream.
-
For the recap message, hover over "Set to expire" beneath the recording thumbnail. In the popout tooltip, click the "View or change" link to open the recording in Stream.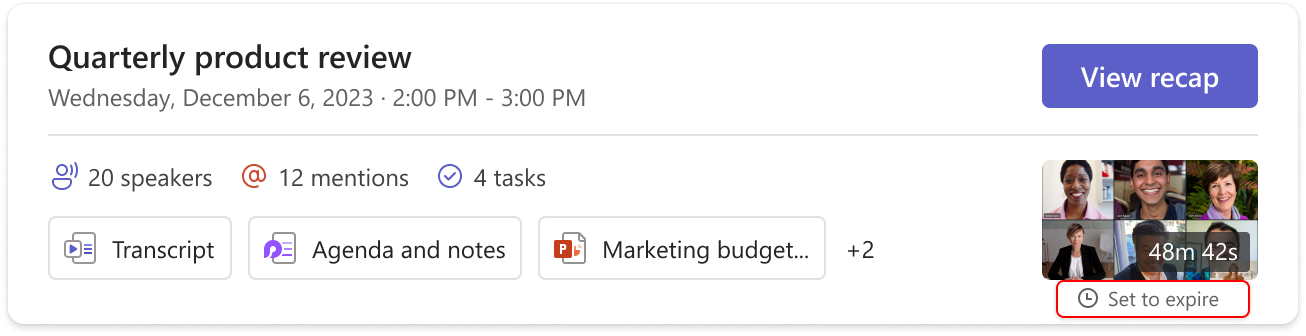
-
For the recording message, click the "here" link to open the recording in Stream.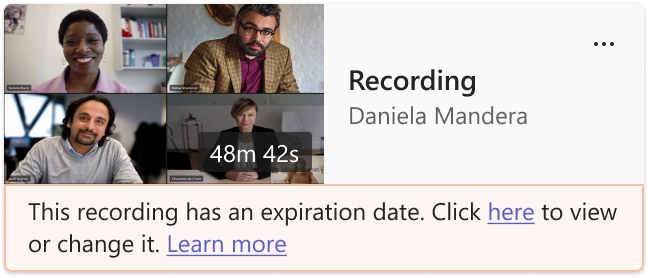
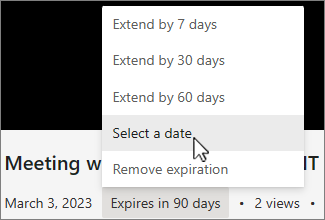
-
On the Stream page, select the expiration countdown beneath the video. Change the expiration by selecting a timeframe from the dropdown menu. You can also choose Remove expiration if you don't want it to be deleted.
Notes:
-
The message indicating that your recording will expire will persist on the recording in the chat even if you remove the expiration date. But don't worry—if you've selected No expiration, it won't expire.
-
The owner of the recording will get an email when it expires. At that point, they'll have up to 90 days to recover it from the recycle bin. Once recovered, the recording will no longer expire automatically.
-
Watching the recording won't affect the expiration date.
-
More info for admins can be found here.
Privacy
All meeting participants will receive a notification in their Teams desktop, web, or mobile app as soon as a meeting recording starts.
Depending on your region, you may need everyone's permission before you can record them. For more information, see the Microsoft Privacy Statement.
The meeting organizer automatically owns the recording. By default, only meeting organizers and co-organizers can download or delete the recording.
|
Type of recording
|
Permission to view
|
Permission to download
|
|
Channel meeting
|
Team
|
User with view permission
|
|
Private meeting
|
Invited and attended users (chat members)
|
User with view permission
|
|
Group call
|
Chat members
|
User with view permission
|
|
One-to-one call
|
Chat members
|
User with view permission
|
|
One-to-one PSTN call
|
Teams user
|
Teams user
|
Troubleshoot recordings
If you're having problems recording a meeting, you'll probably need the help of an IT admin to work through them. Keep these things in mind as you move forward:
-
Both the meeting organizer and recorder must have one of the following licenses: Office 365 Enterprise E1, E3, E5, F3, A1, A3, A5, M365 Business, Business Premium, or Business Essentials.
-
An IT admin must provide a recording license to both the meeting organizer and the recorder.
-
Guests can't record meetings. Federated users can record calls, but not meetings.
Sharing
Play a meeting recording
After a meeting ends, you can find the meeting's recording in the meeting chat or calendar.
From a chat:
-
Go to Chat  in Teams.
-
Select the chat for the specific meeting.
-
Select the Shared tab.
-
Select a recording.
-
When the viewer opens, select Play  .
.
From your calendar:
-
Open your Teams calendar.
-
Double-click the past meeting you want to see the recording from.
-
Select Recap.
-
Select Play .
You can also select the recording thumbnail in Details and select Play .
From a channel:
-
Select Teams  in Teams.
-
Select a channel.
-
Select Files.
-
Find and select the recording. The recording is an .mp4 file and has the  Recording icon at the beginning of the line.
-
Select Play if the recording doesn't start immediately.
Closed or live captions
Live captions are available during a meeting, but aren't recorded.
To turn on captions during a meeting:
-
In your meeting controls, select More actions > Language and speech  .
.
-
Select Turn on live captions  .
.
Your captions will appear under the meeting screen. These captions are only shown to you during the meeting.
You can also start live transcription, which can be viewed after the meeting.
To view closed captions later during playback:
-
Go to Chat in Teams.
-
Select the past meeting chat.
-
Find and select the recording thumbnail.
-
Hover over the video player and select Toggle captions , or press Alt+C.
-
Select your language and view.
If you don't see Toggle captions :
-
Select Open in Stream  at the top of the video.
-
In Stream, select Video Settings  .
.
-
Expand Transcript and captions  > Generate.
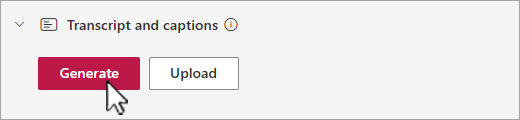
Depending on the length of the video, generating closed captions can take several minutes.
Once generated, you can watch the video in Stream and have captions displayed at the bottom of the screen.
When the captions have been created, the Generate button turns to Translate. Select Translate to change the spoken or screen language to automatically translate the captions.
Customize captions
-
In the video player, hover and select Playback options  .
.
-
Select Caption settings.
-
Choose your caption size, color, or background transparency.
Note: Captions aren't captured in recordings or downloads. However, you can turn them on while viewing a recording in Teams or Stream.
Meeting recording storage and permissions
Teams meeting recordings are automatically stored in the organizer's OneDrive for Business.
Meeting recordings expire after a period of time set by your IT admin. Organizers can change recording expiration dates.
To learn more, see Record a meeting in Teams.
Channel meetings
For channel meetings, the recording will be stored on the Files tab for the channel.
The Files tab stores all files for the channel. Everyone who is a part of the channel will have permission to edit and view the recording.
All other meetings
For non-channel meetings, the recording will be stored in the Recordings folder in the meeting organizer's OneDrive folder. If you were invited to the meeting, you can access the recording through the Files or Shared tabs in the chat, channel, or meeting details.
Note: Only the meeting organizer and co-organizers can edit the recording. But everyone invited to the meeting is able to view the recording.
Share a link to a meeting recording with others
If you organized the meeting, you can share the recording with people who weren't invited to the meeting by sharing it like you would share any other file.
To share a recording from a meeting chat:
-
Select Chat in Teams.
-
Open the meeting chat you want to share a recording from.
-
Select the Shared tab.
-
Hover over the recording you want to share and select More options > Copy link  .
.
-
Paste the link into a message or post to share.
Notes:
-
Guests and external attendees can only view a recording if they're sent a direct link to the recording.
-
To learn more about sharing meeting recordings in OneDrive, see Share OneDrive files and folder.
To learn more, see Customize access to meeting recordings or transcripts in Microsoft Teams.
Download a meeting recording
Only the meeting organizer can download the meeting recording.
To download a meeting recording:
-
Select the Files or Shared tab in the meeting chat or channel.
-
Find and select the file.
-
Select More options > Download  .
.
To learn more, see Edit or delete a meeting transcript in Microsoft Teams.